Last week The Beauty Department posted a DIY for a headband holder. (You can see it HERE!)
I thought that it was such a fun idea! My headbands have always been so unorganized. I loved theirs but very quickly realized that that particular headband holder would not work for the majority of the headbands I have.
I thought about the way they are displayed at Anthropolgie, which is where I get a majority of mine and I saw a necklace holder on Pinterest that quickly inspired this DIY. :)
SUPPLIES:
1×4 Lumber | This is what I used for the base. You only need about a 4in piece so check the scrap wood section and you might get lucky. It’s not imperative to get a piece of wood at 1×4. Look around the scarp section and maybe your will see something you like better!
Dowel Rod | You can sometimes find these in the scrap wood section or with the scrap trim section. I found that a 12-14in section was plenty.
Tree Branch | About a 1ft section of a straight tree branch is all you need. We found a fairly long branch (about 4ft) and cut the best section off.
TOOLS:
Saw* | Only if you want to cut the items yourself. Which we found helpful. Although Home Depot is always there to help you cut anything you buy from them.
Power Drill | Cordless or corded drill will work fine.
Wood Glue | Not necessary, but does help strengthen everything.
STEPS:
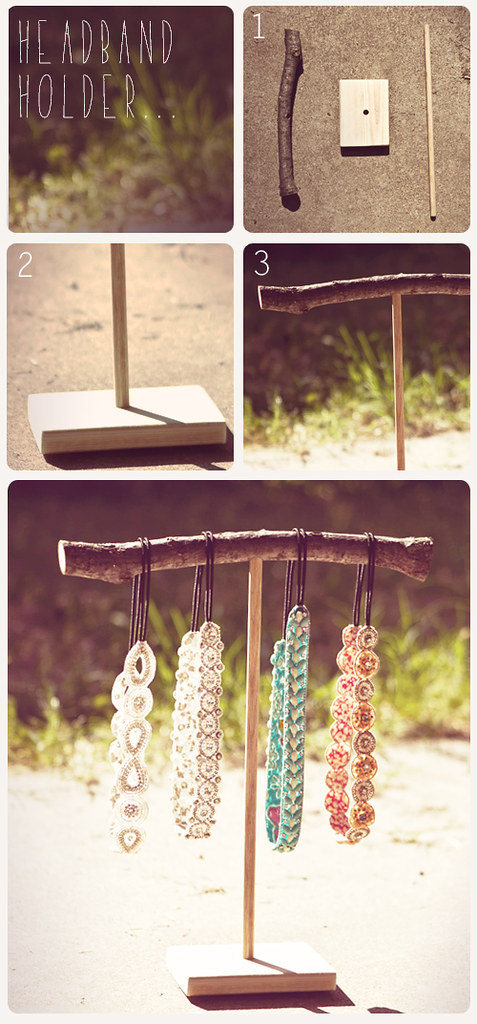
1. Drill a hole 3/4s of the way into the 1×4, this will be your base. Drill another hole 3/4s of the way through the tree branch. The drilled holes should be proportional to the dowel rod you choose.
2. Put the Dowel Rod in the block of wood. This is where a little wood glue will help make it sturdy!
3. Now attach the tree branch to the dowel rod. Again, wood glue helps…
4. Do a little Dance! Because you are done!! See how easy that was?! Now you can enjoy your new headband holder!

No Comments