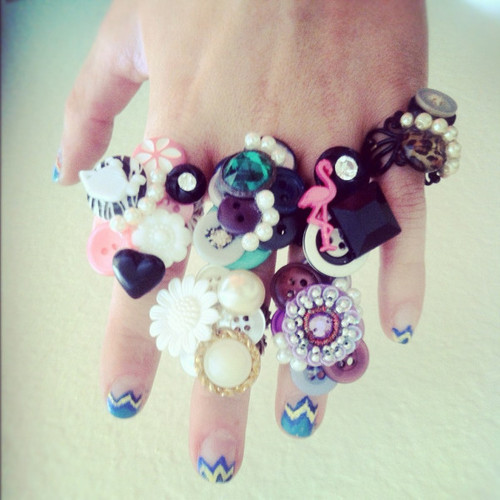
Nuvintage is a jewelry line my friend Jessica started a few years ago to raise money for a mission trip.
She uses buttons, lace, pearls and anything else that inspires her to create necklaces, rings, picture frames and journals! Her motto “Laced in God’s purity…buttoned in His beauty” is the perfect description for her and her Nuvintage line!
A few weeks ago she posted a photo of some new rings she has been working on. I couldn’t help but love her nails! I’ve always had a weakness for chevron you know…

TOOLS:
-Thin angled brushes (I bought this cheap kids pack of 5!)
-3 colors of your choice! (I used acrylic paint because I liked how thick it went on with ONE coat. Acrylic paint is not a must!)
-Paper Plate
-Cup of Water & Paper towel
-Top Coat
STEPS:
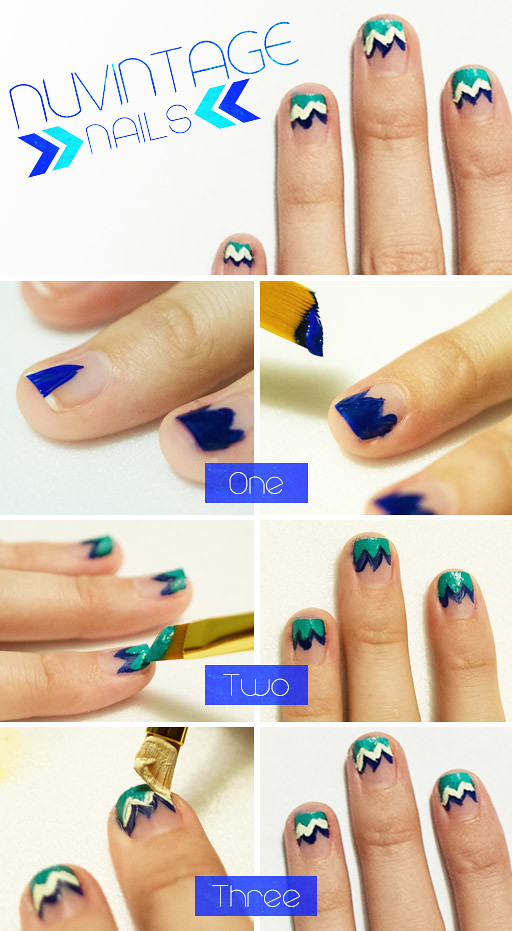
1 | Start with the color you would like to be your bottom line. I used the dark blue. I put my paint on a paper plate so it was easer to get on my paint brush.
I used the second to largest brush from my pack and I created the shape by painting 3 triangles. It should look like an “M” (or a “W” if you look at it upside down!)
Using your cup of water, rinse off your brush so it does not get ruined.
2 | After the first coat has dried, use the color you would like to be the last line of colors (I used a turquoise). By skipping the second line of color for now, you will be able to get the smooth coverage across the tips of your nails.
Using a medium size brush from the pack, I use the same technique of painting 3 (smaller) triangles to get the chevron pattern.
Using your cup of water, rinse off your brush so it does not get ruined.
3 | Once that layer has dried, use your final color (I used a light yellow).
I used the thinest brush in my pack for this one. Paint on the line between the two colors.
Using your cup of water, rinse off your brush so it does not get ruined.
4 | Put on your top coat and you are done!* Because I used acrylic paint it was a bit easier to do clean up. I found that this dries much quicker than nail polish. So, if you are unhappy with lines you can go over again and clean those up.
Since this is all done by hand I found it hard to get this to look perfect, BUT I love this hand-painted look and I can not stop staring at my nails. If you find it is too hard to do all of your nails like this, it is definitely a fun nail accent to try!
*Be sure to seal the tips of your nail with the top coat. Acrylic paint will not stay on as well as nail polish so this will help the paint last longer. :)


13 Comments
2pinnacle
3animals
gay dating sites defiance ohio
superchub gay dating https://gaypridee.com
best dating apps for gay
gay dating denver, co https://gay-buddies.com
sado masoicsm gay dating site
gay teen dating website https://gayprideusa.com
minneapolis gay dating
free dating gay site https://speedgaydate.com
gay latino's dating
free gay dating skwerts https://gayfade.com
gay dating game
gay dating free https://gaysugardaddydatingsites.com
1pertinacity
1assumption
video chat older gay
gay chat randome https://bjsgaychatroom.info/
gay dating in ohio
gay stoner dating https://gaypridee.com/
gay boy chat
gay video chat room https://gaytgpost.com/
gay massachusetts chat no sign up
chat ave gay chat https://gay-buddies.com/
smooth chubby chub gay dating
dating a gay porn star https://speedgaydate.com/