What you will need:
Base & Top Coat
Dark Pink
Medium Pink
Light Pink
Reinforcement stickers
Steps
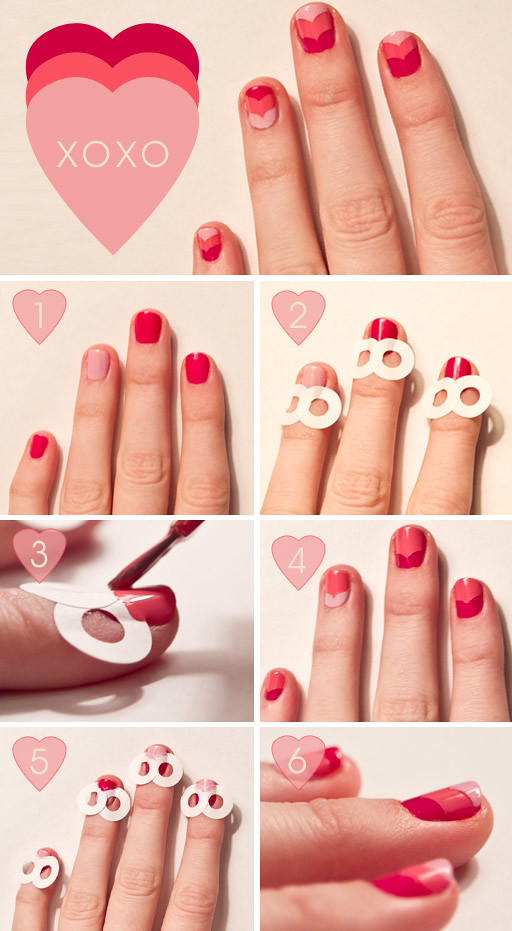
1. Start with either your darkest pink or lightest pink. (I will do both for you!) Try to use colors that have good coverage with just one coat; you want this layer to dry completely before the next step.
2. Put two reinforcement stickers together (should look like an “8”) and place them towards the bottom of your nails. You are going to do this twice so look at your nail and cover 1/3 of each. We want to make room for all 3 of the colors for the final look!
3. Paint your medium color. If possible just paint one coat, you will also want this to dry completely before placing stickers on your nails again. I personally like to use quick drying nail polish for the first and middle layers. (Sally Hansen has a bunch of great colors that are “Insta Dry”!!)
4. Remove the stickers when the paint has dried with your medium shade. Waiting for it to dry is important because removing the sticker too soon will cause the nail polish to smear and not have clean lines. TRUST me. :)
5. Now repeat steps 2 & 3, this time, using either your darkest pink or lightest pink. (I was able to reuse my stickers, so I used 20 stickers total.)
6. Remove the stickers once that layer has dried and check out those nails!!! At first, they may look choppy and layered but once your apply your top coat it will even out and complete the look on your nails. Plus putting stickers on your nails can dull your color some, so this also helps your colors be bright and shiny again.


126 Comments
Carrie R
How adorable – totally going to try this now that my nails are growing!!!
Cassie Sanchez
what are the exact colors used….if you can remember??
2thriller
1offering
2angelina
1donated
gay chat colorado
gay masturbation live chat https://bjsgaychatroom.info
gay dating a macho
gay mucle dating https://gaypridee.com
superchub gay dating
gay punk dating https://gay-buddies.com
gay dating sex
athletic gay dating sites https://gayprideusa.com
best gay dating sites for southwest florida
gay dating denver, co https://speedgaydate.com
gay dating apps 2019
gay dating sites defiance ohio https://gaysugardaddydatingsites.com
2fabrication
3dollars
gay phone chat line phone numbers
whosaguy gay chat room https://bjsgaychatroom.info/
#ИМЯ?
newest gay dating site https://gaypridee.com/
free 60 minute trial phone chat gay local
gay chat on webcam https://gaytgpost.com/
single gay men chat line highpoint nc
line group chat gay tampa https://gay-buddies.com/
gay dating for ftm's
gay blatino dating https://speedgaydate.com/
Judyhot
purchase cialis 10mg
Paulhot
where to buy cialis over the counter uk
Kiahot
order sildenafil india
Yonhot
ivermectin generic
Wimhot
stromectol covid
Boohot
ivermectin usa
Teohot
buy brand viagra cheap
Teohot
cialis for daily use
Zakhot
tadalafil cost australia
Judyhot
buy doxycycline online no prescription
Teohot
ivermectin 8000 mcg
Kiahot
lasix brand name in india
Kiahot
buy clonidine uk
Boohot
cialis 5mg online australia
Carlhot
purchase zovirax
Teohot
ivermectin lotion for scabies
Wimhot
buy generic propranolol
Carlhot
amoxicillin 5000 mg
Boohot
generic zoloft no prescription
Teohot
anafranil 25g
Markhot
sildenafil online sale
Kiahot
ventolin online australia
Ugohot
budesonide over the counter
Boohot
zoloft 3000mg
Boohot
fildena 120 mg
Boohot
propeciaoffers.com
Judyhot
buy amoxil
Teohot
pharmacy home delivery
Lisahot
drug gabapentin 300 mg
Amyhot
cost of generic biaxin
Judyhot
buy clomid online with paypal
Boohot
how to buy cafergot
Teohot
amoxicillin 500 price in india
Lisahot
furosemide 3170
Wimhot
lisinopril 10 india
Teohot
suhagra tablet 50 mg
Kiahot
generic noroxin
Teohot
retino 0.05 gel
Paulhot
cheapest pharmacy canada
Markhot
ventolin over the counter australia
Ugohot
ventolin over the counter uk
Judyhot
zovirax best price
Lisahot
tizanidine online purchase
Zakhot
tetracycline 125 mg
Teohot
buy viagra pills online in india
Zakhot
dexamethasone canada
Yonhot
sumycin over the counter
Tedhot
where to buy prednisone online without a script
Teohot
dexamethasone
Tedhot
buy tetracycline online usa
Zakhot
buy fildena
Zakhot
prednisone 20 mg online
Teohot
fildena 200mg
Yonhot
prednisone price in india
Teohot
buy tetracycline online without a prescription from canada
Zakhot
where to get prednisone
Yonhot
ventolin 4mg tablet
Zakhot
lexapro cheapest price australia
Zakhot
buy lexapro uk
Yonhot
lexapro 15
Tedhot
buy lexapro online usa
Carlhot
online pharmacies that use paypal
Yonhot
where can i buy terramycin eye ointment for my cat
Tedhot
otc prednisone cream
Tedhot
viagra 200mg tablet
Yonhot
terramycin tablet
Zakhot
buying prednisone from canada
Zakhot
benicar 5 mg cost
Tedhot
sildenafil 100 mg tablet cost
Teohot
fildena 100 online india
Teohot
lexapro canadian pharmacy
Zakhot
ventolin cost australia
Yonhot
tetracycline price
Tedhot
how to get viagra prescription in canada
Teohot
lexapro 30
Yonhot
buy fildena 100mg
Zakhot
albuterol 2mg tab
Zakhot
prednisone tablets 5mg price
Teohot
generic viagra without rx
Judyhot
strattera
Kiahot
can i purchase valtrex over the counter
Judyhot
how to get zofran over the counter
Maryhot
biaxin generic cost
Maryhot
zofran 4mg pharmacy price
Zakhot
nolvadex price in mexico
Zakhot
hydrochlorothiazide 25 mg cost hydrochlorothiazide pills zestoretic medication
Zakhot
usa over the counter sildenafil
Maryhot
generic fluoxetine fluoxetine 10mg fluoxetine tablets brand name
Zakhot
prednisone 60 mg tablet
Zakhot
chloroquine phosphate uk
Ashhot
buy strattera online india
Maryhot
cleocin 150 mg cost
Ashhot
prednisone brand
Zakhot
baclofen generic brand
Maryhot
generic celebrex 200mg price
Zakhot
prazosin generic cost
Zakhot
acticin
Maryhot
elimite cream generic
Maryhot
biaxin cream
Ashhot
mail order propecia
Zakhot
dexamethasone 500 mg tablet
Ashhot
azithromycin 250 mg price in india
Ashhot
clonidine 136
Zakhot
cost of minocycline
Maryhot
zoloft price in india
Maryhot
tetracycline 250 mg price
Ashhot
zithromax in usa
Zakhot
augmentin 500 price
Ashhot
valtrex uk
Zakhot
buy roaccutane